


Mandala hand art has always fascinated me with its swirling patterns and calming vibe. There’s something magical about seeing those symmetrical designs bloom right on your palms or the back of your hands, turning a simple body part into a canvas of intricate beauty.
I remember the first time I tried it during a friend’s wedding. She had this stunning henna design covering her hands, full of circles, flowers, and dots that radiated outward perfectly. It wasn’t just pretty—it made her feel confident and connected to something deeper.
That’s the charm of mandala hand art. It combines ancient symbolism with modern creativity, whether you’re using henna for temporary adornment or pens for permanent doodles.
These designs often draw from traditional mehndi, where mandalas represent harmony and the universe in a circle.
What Makes Mandala Hand Art So Special
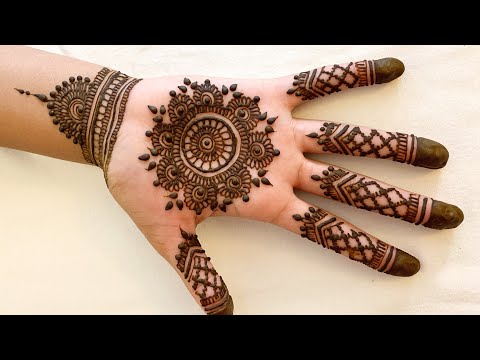
At its core, a mandala is a circular pattern that starts from the center and builds outward in balanced layers.
When applied to hands, it follows the natural curves of fingers and palms, creating a flow that’s both artistic and soothing to look at.
Many people associate it with Indian henna traditions, especially for brides, but it’s evolved into a global trend.
You see it in tattoos, temporary stickers, and even mindful drawing exercises.
The symmetry isn’t just for looks—it mirrors life’s balance, reminding us to find calm amid chaos.
I’ve chatted with friends who do this art regularly, and they say the process feels meditative, like zoning out while creating something gorgeous.

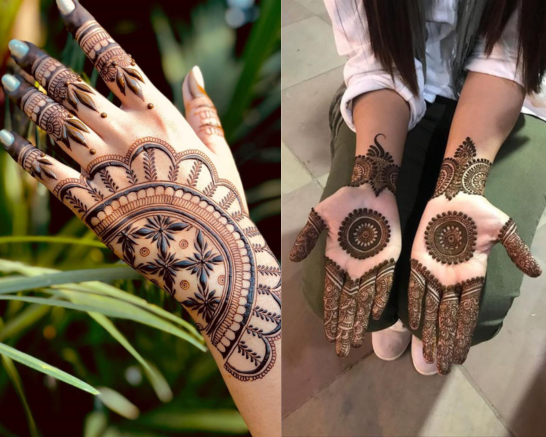

These examples show how a central floral motif can expand into detailed petals and swirls, covering the entire hand.
The Roots of Mandala Hand Art
Mandalas trace back thousands of years to Hindu and Buddhist traditions, where “mandala” means circle in Sanskrit.
They symbolized the universe, wholeness, and spiritual journeys.
Monks would create elaborate sand mandalas, only to sweep them away, teaching impermanence.
In India, similar geometric patterns appeared in rangoli floor art and mehndi body designs.
Henna artists started incorporating full mandalas on hands for special occasions, like weddings or festivals.
The circular shape fits perfectly on the palm, with extensions trailing up fingers like vines.
Over time, this blended with modern influences, leading to the mandala hand art we love today.
It’s not strictly cultural anymore—anyone can try it for fun or therapy.
Psychologist Carl Jung even used mandalas in therapy, believing they help access the subconscious.
Drawing one on your hand? That’s personal healing in motion.
Why Try Mandala Hand Art Yourself
Beyond the beauty, there’s real joy in creating or wearing these designs.
The repetitive patterns can lower stress, almost like coloring books for adults but on your skin.
One evening, after a long day, I grabbed a fine-tip pen and doodled a simple mandala on my palm.
It took about 20 minutes, and by the end, my mind felt clearer.
Studies back this up—focusing on symmetry boosts mindfulness and reduces anxiety.
It’s also a confidence booster. Hands are always visible, so a cool design draws compliments and sparks conversations.
For temporary versions, henna lasts a week or two, fading naturally.
If you’re bold, permanent tattoos offer lasting art.
Many start with washable markers to practice.
Getting Started with Simple Mandala Hand Art
If you’re new to this, don’t worry—beginners can create stunning pieces with basic tools.
You’ll need a clean hand, a henna cone or fine black pen, and maybe some reference photos.
Start in the center of your palm with a small dot or circle.
That’s your focal point.
Then, add petals or dots around it, keeping everything even.
Build layers outward: next ring could be teardrop shapes, then scallops or lines.
Extend patterns to fingers for full coverage.
Keep it symmetrical by mirroring one side to the other.
Practice on paper first if henna feels intimidating.
Many online tutorials show slow-motion applications.


-friendly versions use basic dots and lines that anyone can replicate.
Tools and Materials for Mandala Hand Art
Choosing the right supplies makes all the difference.
For temporary designs, natural henna paste is classic—it’s cooling on the skin and stains a rich reddish-brown.
Pre-made cones are easy for beginners.
If you want color variety, try jagua gel for black-blue tones or white henna for boho vibes.
For non-staining practice, fine-tip sharpies or skin-safe markers work great.
They wash off easily with soap.
Tattoo enthusiasts might opt for professional ink, but that’s a bigger commitment.
Always patch-test for allergies, especially with henna—some mixes contain additives.
Clean your hands well before starting for better adhesion.
Aftercare? Moisturize to prolong the design.
Step-by-Step Guide to Creating Your Own Mandala Hand Art
Let’s walk through a basic process.
First, wash and dry your hands thoroughly.
Sit comfortably with good lighting.
Step one: Mark the center of your palm lightly with a washable marker.
Draw a small circle or flower there.
Step two: Add eight evenly spaced petals around it.
Use dots for the tips to keep it simple.
Step three: Create the next layer with larger shapes, like curved lines or leaves connecting the petals.
Repeat patterns radially.
Step four: Fill gaps with smaller details—dots, swirls, or cross-hatching.
Step five: Extend to the back of the hand and fingers.
Trail vines or geometric bands up each finger.
Mirror the design on both hands for balance.
Let henna dry for hours, then seal with lemon-sugar mix for deeper stain.
With pens, trace over lightly first, then bolden lines.
Mistakes? No big deal—embrace the handmade charm.
Inspiring Variations in Mandala Hand Art
One reason I love this art is the endless options.
Traditional styles feature heavy florals and paisleys, perfect for cultural events.
Modern twists add geometric elements, like sharp lines and triangles for an edgy look.
Some go minimalist with just dots forming a mandala grid—super easy yet elegant.
Floral fusions mix lotus blooms and vines for a feminine touch.
Bold versions cover full arms, but hands alone make a statement.
Seasonal ideas? Snowflakes in winter mandalas or suns for summer.
Mix metals with gold temporary tattoos over henna for glam.


Mandala Hand Art as a Mindful Practice
Beyond decoration, drawing these on your hands turns it into therapy.
The focus required quiets racing thoughts.
Each stroke builds patience and presence.
Friends who’ve tried it during stressful times say it grounds them.
It’s portable too—no need for a studio, just your hands and a pen.
Some use it for journaling emotions, assigning meanings to shapes.
A crowded center might reflect busy life, while open spaces show calm.
Over time, you notice patterns in your designs mirroring your mood.
It’s like wearable self-reflection.
Cultural Significance and Modern Twists
While rooted in South Asian traditions, mandala hand art has gone global.
In weddings, it symbolizes joy and prosperity.
Brides often get elaborate versions the night before, with family joining in.
Today, festivals like Diwali or Eid feature simpler takes.
Western adopters love it for Coachella vibes or yoga retreats.
Tattoo artists blend it with mandala sleeves or finger details.
Respect the origins—many artists credit mehndi traditions.
It’s beautiful how cultures share and evolve art forms.
Common Mistakes and How to Avoid Them
Newbies often rush symmetry, ending up lopsided.
Tip: Work one section at a time, rotating your hand.
Overloading details can muddy the design—start sparse, add more if needed.
Henna too runny? Practice cone pressure on paper.
Pens smudging? Let layers dry or use quick-dry formulas.
Skin irritation? Stick to pure henna.
Most importantly, don’t aim for perfection.
Hand-drawn wobbles add character.
My early attempts were wonky, but I wore them proudly.
Caring for Your Mandala Hand Art
To make it last, avoid water for the first day with henna.
Wrap in plastic overnight for darker stain.
Oil with coconut or balm daily.
It’ll fade gracefully over 1-2 weeks.
For marker versions, top with hairspray for light protection.
Show it off, but gentle handwashing preserves details.
When it fades, it’s a reminder of impermanence—just like traditional sand mandalas.
Sharing and Connecting Through Mandala Hand Art
One fun part is sharing your creations.
Post on social media—communities love seeing unique spins.
Join challenges or swap ideas with friends.
Host a henna night; it’s bonding time.
I’ve seen groups where everyone designs on each other.
It sparks creativity and laughter.
Kids love simple versions too—safe markers for family fun.
It’s inclusive art, no experience needed.
Advanced Techniques for Stunning Mandala Hand Art
Once comfortable, layer shading for depth.
In henna, scrape for highlights or add glitter.
Pens? Try watercolor washes over outlines.
Incorporate symbols—lotus for purity, peacocks for beauty.
Finger trails can tell stories, like waves flowing from the palm.
Experiment with negative space, leaving skin bare for contrast.
Some artists freehand massive designs in minutes—practice gets you there.